Search Results For "ceiling"

masterbedroom-vercelliceilingfan

I hope all the Moms out there had a great Mother’s Day! When I envision my ideal Mother’s Day, I picture sitting around in the backyard sipping mimosas with Mr. S., while my kids happily play nearby. Of course reality is quite different, but I feel very fortunate to have such a wonderful family who I adore, temper tantrums and all.

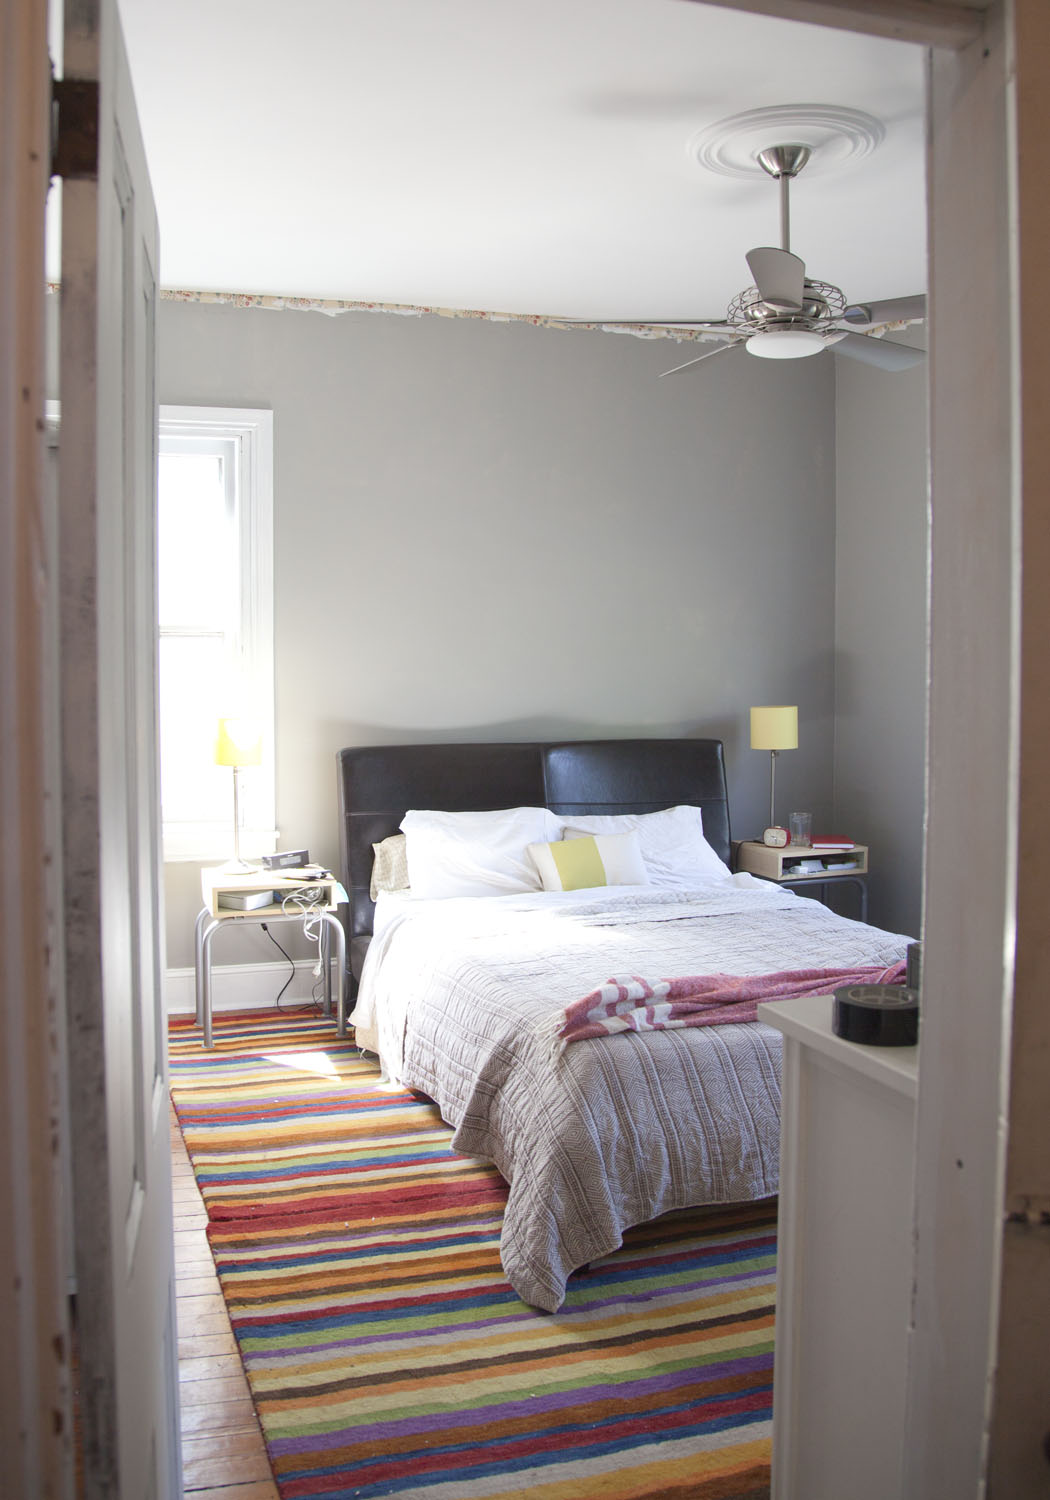
We are making slow but steady progress in the bedroom. Mr. S. has left the critical path, but now we have an actual functioning ceiling fan complete with a ceiling medallion! I know that fans are often frowned upon in the design and blogger world, but for comfort and energy savings they are hard to beat.

VercelliCeilingFan-HomeDepot

Hampton Bay Vercelli Ceiling Fan in Brushed Steel, Home Depot $209

I also think this one is pretty good looking. It is definitely on the modern side, but I like it. Our cats are VERY suspicious and Spike won’t even come in the room, which is very unlike him. We also incorporated a ceiling medallion. Previously we added plaster ones in the Living Room and Kitchen but decided to give a lightweight urethane one a try this time. This is the Reece Ceiling Medallion from Architectural Depot, $24.45. I’ve never ordered from them before but the price was right and it shipped the same day I ordered it. It was easy to cut and Mr. S. was able to use longer screws on the ceiling fan bracket to make everything work with the added depth. I think the quality is pretty good and after some primer and ceiling paint I think you would be hard pressed to know the difference.VercelliCeilingFan-ControlsThe ceiling fan installation had a few small hiccups, but overall wasn’t too bad. I was going to have our contractor install it, but with the hot weather coming later this week, Mr. S. was growing very impatient. The wall control that comes with the unit is pretty fancy and so far works well. The light can even be dimmed. I give it the thumbs up! We may order the same one for the kids’ room.

Now onto the closet wall (i.e. the unfinished side of the room)…

masterbedroom-pax-progress
The Ikea PAX unit is looming at the moment, but I think once we get doors and install the floor to ceiling curtains on the other side of the room, I think everything will balance out. As you can see we have installed one of the four units. The base on the right one is ready to go, but our AC guys are going to be running a duct to the right and I was afraid if I put it in, they wouldn’t be able to get it in, so I am holding off temporarily. Almost all of my clothes are now piled up in the closet, not quite a girl’s dream closet yet, but at least it has potential! I am going to start the bases for the middle tonight now that the old cabinet is empty and can be brought out to the garage. Then we should be able to empty out the playroom enough to allow the AC guy to get into the closet in there. As you can see it is all a giant puzzle, that gets harder and harder to solve as we move along.

I have to say that the PAX was pretty easy to put together. I wasn’t sure what to expect but it didn’t take very long and Ikea has a new plastic “tool” that helps you properly space the nails for the back piece. It is interesting that the pins for the closet shelves screw into place. Clearly the shelves and the rails help stabilize the unit. I wasn’t expecting that, but putting those in really tightened it up.

How was your weekend? Did you cross off anything from your to do list?

P.S. I will be back with an update from the Scott Arboretum Plant Exchange later this week. It was a lot of fun and my garden is a little bit fuller.

Leave a comment

coolsky-behrpaintchip

Unfortunately I don’t have a whole lot of exciting stuff to show. You are welcome to come over and watch my primer dry if you like. The electrician has been working away and hopefully the AC contractor will start in the next week or two. My regular contractor is done until the AC contractor is finished. In the meantime though I needed to pick out a paint color for the hallway and a ceiling fan for the bedroom, and prime and paint the bedroom and hallway. The paint samples required 4 testers, but we have a winner! Cool Sky by Behr it is! I would say that it is a light gray blue. If left to choose by myself I would have chose something slightly darker, but since Mr. S. and I have to agree (and both live with it) this is what we are going with. One of the few downsides to my other half being an Art Director is that we spend a lot of time discussing color. The good thing is that we usually come to a consensus after a few rounds. The lights in the final space with be halogen and LED so the color should feel more blue and less gray once those are in (currently there is a sad incandescent bulb hanging in the hallway which give a yellow glow).

coolsky-behr

I am having a hard time getting a good picture of the color. It is less gray in person. And yes all of the trim in the hallway will eventually get painted. The white trim is pretty dingy looking at the moment.

So it is on to the Master Bedroom Ceiling Fan. We chose this one for the hallway:

acquaceilingfan-bronze

Acqua Ceiling Fan in Bronze from Matthews Fan Company, purchased from Joss & Main but available at Lamps Plus

We had been planning on installing a silver colored fan for our room, but then I started to doubt my choice with the oil rubbed bronze in the hallway. I went on a long tangent of searching for the perfect fan (with a light) and in the end I pretty much ended where I started, but not quite. Clearly a Ceiling Fan Round Up is in order.

I first pinned this Acero fan over a year ago. I still like it and its slightly industrial vibe. The price was a little bit more then I wanted to spend, but given all of the ugly ceiling fans out there I was pretty much resigned to go with it until…

I came across this almost identical one at Home Depot for half the price! The only difference I can find is that it has 5 blades instead of three and the blade shape looks slightly different. It is on its way now! It should be here tomorrow.  I am just relieved to cross this off my list. Hopefully I will like it in person!

Does anyone else have any ceiling fans to recommend?


7 Comments

Basement Beadboard Ceiling Details

The most popular question I get on my blog, is about the beadboard ceiling in the basement. I have promised to write a more detailed post. So here it goes…

I am become sort of a beadboard expert over the years. I didn’t start out this way, but our house is old and already had a good bit of beadboard, and I have had to patch some over the years as well as installing new. Beadboard and wood planking comes in all sorts of sizes and dimensions and range in price from totally affordable to kind of expensive. I’ve used a bunch of different varieties for different uses. In the basement we have used 3 different types.

Beadboard Detail at the Window

1. Walls: We used a classic full size tongue and groove beadboard for the walls. This is 3/4″ thick and approximately 6″ wide. One one side there is a “bead” in the middle and on one end, giving you about a 3″ repeat. On the back it is smooth with a simple v-groove at the joint. The basement already had some of this board on the walls, so we actually salvaged what we could for re-installation. The nice thing about this is that you don’t need any backup. This is strong enough to act as the wall surface. It is simply nailed to the studs. This is also what is installed on our porch roof (which is what this type of board was originally meant to be used for). Fortunately Home Depot sells it in 8′, 10′ and 12′ lengths.

Thin Plank Ceiling in Bathroom. This is permanently attached.

Our Dining Room Ceiling: Beadboard & Beams attached to a plywood substraight

2. Ceiling Option 1: For our Dining Room Ceiling and the Ceiling in the new basement Bathroom we used a thinner beadboard product. It is still tongue and groove but it is only about 3/8″ thick. This will tend to warp, so it usually requires a back up material (in our case 1/2″ plywood). This nice thing is that it is really light weight and easy to cut. These come in shorter length and are packaged in sets. They are available in pine unfinished and white, as both a beadboard and a plank product. For our Dining Room we used the beadboard and for our bathroom ceiling we used the plank. In both cases we went with the less expensive pine and primed and painted it ourselves. However this isn’t a good option for a removable ceiling since the piece are flimsy and have a tendency to warp if not attached to a substraight.

Basement Beadboard Ceiling Details

3. Ceiling Option 2: For our removable ceiling we want with a sheet product. This is about 1/8″ thick and is available in a 4’x8′ sheet and primed white. This is easy to work with and inexpensive. However because it is so thin it will tend to sag, so we had to be careful about not making the spacing too large. This also meant creating a “grid” out of wood for the panels to sit in. The nice thing about the thin panels is that it helped us maximize the ceiling height. We even bent one panel about 1/2″ to allow for an extra low pipe.

Ceiling w/ T-Shaped Pieces Installed

Step 1:We started by creating an upside down T shape out of 2 1×4 pieces and attaching them perpedicular to the floor joists above. This gave us enough space for the miscellaneous plumbing to fit.

Step 2: Rough in lights as required. We centered our in each “bay” of the ceiling. This took a lot of effort to come up with a pattern. Our ceiling was full of pipes and other obstructions (we are below the kitchen). I stood there for about a half hour with my contractor and a piece of paper trying to come up with an acceptable pattern.

Testing Panel Locations before Installing the Cross Piece

Step 3: Figure out the spacing on the panels and test fit.

Step 4: Install the cross pieces. We used 1×2 with a groove cut for the panel and notches out on either side for them to sit on the 1x4s running the other way.

Ceiling Before Painting

Step 5: Install all of the panels. Because everything is pretty snug it definitely takes a little adjusting to get them into place. We installed the ones with lights first,since the trim piece goes over the panel.  I have to say that it is kind of pain to move them, but I don’t plan on doing it very often (maybe once a year to tops). The one advantage I do see is that if I get a leak above (i.e. the dishwasher) it would most likely only require taking 1 panel out.

Finished Ceiling

Step 6: Paint. Okay so I should have painted the frame before putting the panels in, but I didn’t. Oh well. I really like how it came out.

Cost: I have also gotten several questions about cost. The materials themselves were not very expensive for this ceiling. Most of the cost is in the labor, for installing the upside down T-pieces (while dodging pipes), cutting the panels to fit and making the cross-pieces. It is also pretty slow going! If you are up for doing it yourself and you have the time, I think it is worth it. Paying for a contractor to do it, is definitely not cheap though.

More Questions? Just add a comment and I will do my best to answer them.

15 Comments

Beadboard and Beam Basement Ceiling

My neck (and Mr. S’s) is a little sore but the ceiling is painted! Yeah! It took a couple of coats of ceiling paint but it is finished. We used 1 coat on the beadboard panels themselves (which were already white) and 2 coats on the wood beams. Mr S. manned the paintbrush and I used the small roller. The great news about this being finished is that we are one step closer to installing carpet. We still have a fair amount of trim to paint (mostly in the windows) but most of the large surfaces are finished, which feels great.

More White Ceiling & Trim

The Work Room

We also managed to clear out some space in the work room so our contractors can install drywall this week. Besides drywall they are going to relocate a few of our old florescent fixtures for the room and put them on a switch for us. We are not going to put a ceiling in here right now and I don’t want to spend more than we have to in this space, so we thought reusing the old lights in here made the most sense (at least for now).

The Work Room Plan

The plan for this room is that it will be for using all of our wood working tools and for house projects. It is hard to see the space right now because we have shelves awkwardly placed in the middle of the room but there should be space for:

Front Bay Area for Work Bench

1. Work Bench: This will go in the front bay and have some open shelving below to hold some of our power tools. I actually already own the legs for this and it should be a fairly quick install.

Long Wall for Shelving

2. Long Wall of Shelves: We haven’t decided what kind (whether we will reuse our old wood ikea shelves or the old wire shelves that were there before). This will hold paint, wood & miscellaneous house parts. The old shelves were never used very efficiently, so I hope to remedy this with the new layout.

3. Peg Board: We are going to install peg board on the short wall next to the utility sink. This will be good for some of the small hand tools. I plan on painting it blue.

4. Work Table: Fingers crossed there will be enough space for a medium size work table in the middle of the room. This would be on casters so it could move around. When we do some of our bigger projects there are times that I really need some space to set out my work.

Utility Sink

5. Utility Sink: This is already installed and ready to go! I’ve already made good use of this. It is a little alcove behind the shower. I went with an inexpensive model from Home Depot. I should have upgraded to a better made model. We had to shim the front legs to get the drainage to work at the bottom of the sink. It also required lots of extra support to keep it sitting firmly.

* To see all of the posts about our basement click here.

2 Comments

Faux Slate Vinyl Tile with Grout

Last night I managed to slog through and install the grout in my faux slate vinyl flooring (TrafficMaster Ceramica Resilient Vinyl Tile in Coastal Gray). I think it looks fairly convincing and it was certainly less expensive and thinner than using real slate. Plus I don’t have to worry about sealing it.

Pre-Mixed Grout in Delorean Gray

I used the recommended premixed grout in Delorean Gray. I can’t say I am a big fan, but they do not recommend the typical dry grout that you mix with water. I found the grout to not be as sticky as I would like and yet at the same time it really stuck to my hands.

Grout Stuck to My Hand

Anyway, it was not particularly difficult, just messy. I stepped in joints several times while I was cleaning the joints with a sponge and it got on my feet and pants leg. Yuck! I assume that they recommend this product because it is suppose to be more flexible. Fingers crossed it will hold up. I will also be putting in some grout sealer after I get the laundry area finished to help the grout lines stay clean. So stay tuned to see how it holds up!

Laundry Area w/ new lights & Faux Slate Floor Beyond

My contractors have been busy in the laundry area. We now have lights! I can’t say how excited I am about the concept of actually being able to see my laundry! The ceiling is moving along and part of the wall that hides the hot water heater is in! The radiator pipes will be staying (painted white eventually). I will also be adding shelves to the right of the dryer. I am not sure what to do with the visible side of the dryer.  It isn’t the most beautiful thing. Anyone have an ideas? Maybe some kind of fabric.

Ceiling in Main Room w/ LED Recessed Lights

They are finally done with the drop beadboard ceiling in the main room! It looks great. It still needs a couple of coats of paint to finish it off, but it really helps finish off the space. The brick wall in the picture is on a 45 degree angle and is for the fireplace in the kitchen above.  We will be mounting a TV on it (there is an outlet in the ceiling for us).

My contractors have been cranking away here in the bathroom today and we already have a working sink and shower (although the final brackets still need to go in). If all goes well we will have a toilet in by the end of the day. YEAH!

Still on the to do list is the beadboard ceiling in the second space (aka the future pantry), floor leveling and miscellaneous trim.

* To see all of the posts about our basement click here.

2 Comments

Basement ceiling w/ beadboard walls & door

Our contractors are still moving along on the basement ceiling. There are also a few trim pieces that they are suppose to get installed for us. We hope to whitewash most of the walls this weekend and paint the door (a fun color that is yet to be determined). I am loving the new lights, the space feels a little moody, which I really like. I also like that in the middle of the day it is now bright enough with the windows and white ceiling that you don’t even need to turn on the light to walk around (which is a huge and pleasant change!).

More Basement Ceiling!

We will be painting all of the ceiling trim white and giving the beadboard panels a coat as well to make them feel less shiny and new.

Bathroom Floor Prep: Leveling and more Leveling!

They are finishing preparing the floor for our vinyl install this weekend. We decided that we would install the vinyl tile and faux grout ourselves, to speed along the process. The floor hasn’t been leveled in the laundry area yet so we will be only doing phase 1. Next weekend we should be able to do phase 2 (and live without a washer and dryer for a few days). Floor prep is definitely not a strong suit of mine (I don’t have the patience) but it does make or break an install like vinyl, since any discrepancies in the floor tend to telegraph through (which I don’t want).

What color do you think I should paint the door? Blue maybe?

I hope everyone has a great weekend (and enjoys the beautiful weather)! 

* To see all of the posts about our basement click here.


Leave a comment

The Last of the Main Section of Beadboard went in! I love how it looks!

It was a productive day yesterday down in our basement. I did a little demolition on a couple of random old ceiling pieces that were in the way (a great way to start off the morning I might add), but the more exciting part is that they started working on ceiling in the main room. They also completed the last major wall of beadboard (there are still a few smaller areas to do).

My contractor and I went back and forth on the design for the ceiling since I wanted it to be removable to have access to all of the plumbing and electric up there. We ended up going with some extra “beams” spaced at about 3′ apart. These will have cleats to pick up the thin beadboard sheets that will make up the ceiling plane.

Another Shot of the Beadboard on the Back Wall and the Ceiling Grid

The ceiling cleats are made up of 1×1 for the wall edge and for the middle it is a 2×4 attached vertically (cut for all of the plumbing pipes) and 1×4 piece of poplar hung horizontally. I like that it is simple and effective. There will also be some pieces running perpendicular to pick up the sides of the beadboard panels about every 4′. This will also be a 1×1. The trim, cleats and boards will all be painted white when we are finished. At the light area you will need to pull down the housing to remove the panel, but they are just clipped in place, so that should be fairly easy.

A Small Section of the Beadboard Panel Ceiling is in Place!

The lights are one of the most exciting parts. This is the first set of photos down there where I didn’t have to do lots of color adjustment to make up for the horrible florescent strip lights (Yeah!). The new recessed lights are made of a standard 6″ ceiling can with a special LED light bulb/housing attached. The LED downlight comes with its own cover and is reasonably priced at $29.99. The standard recessed can is about $8, so for a total of $38 you have a super efficient, good looking light. Plus the light used 9.5 watts but is the equivalent of a 65W bulb, it will last for 20 years and not get hot (which is an added bonus for a space like this).

6" Halo Recessed Housing, $46.79 for 6

EcoSmart LED Downlight, $29.99 at Home Depot

When I started researching options for the recessed lights, I wasn’t sure how the system works, but basically the LED light and cover attach to the old school screw in socket meant for an incandescent bulb inside. It is also interesting to watch the price come down on these guys. The LED light and cover where priced at $49 last year. So by next year the price will probably go down again. For a price comparision if we had gone with incandescent we would have spent about $8-10 for the cover and bulb, so we spent an extra $20 per light. We are installing about 12 of these, so I am spending an extra $240, but I won’t have to replace them until the kids are out of college (kind of strange to think about!). I will give a more full report once they are all up and running to see how bright they feel.

* To see all of the posts about our basement click here.

The weather is beautiful here today, I think it is time to get weeding!

2 Comments

The Beadboard Ceiling!

1990s Drop Ceiling (& Kitchen) Before

1950s Ceiling Covered up by 1990s Drop Ceiling

Florescent Light (installed in 1990s drop ceiling) and 1950s Ceiling Above

The beadboard ceiling is finally finished at Andi & Neil’s house! I haven’t seen it in person but from the photos that Andi sent me yesterday it looks lovely!

This is now the 4th ceiling that this kitchen has seen.

The History of the Ceiling:

1890s: Plaster Ceiling

1950s: Glued on 12×12 acoustic tiles with interesting turquoise crown molding

1990s: Drop 2×4 Acoustic Ceiling (with 2×4 Florescent Light Fixture): Dropping the ceiling by about 9″ in height (I don’t know what people were thinking when they did this!)

2011: Painted Beadboard and Beam Ceiling

Historically Accurate?

I get asked questions about whether beadboard is historically accurate to a kitchen (or other rooms in the house). The answer is yes, but probably not as detailed as this one. Traditionally secondary spaces such as the kitchen and bathroom used less expensive materials and trim. For example in our kitchen (now dining room) they installed beadboard on the bottom 4′ of the wall. They also used plainer window and door trim but they still used a plaster ceiling.  They would not of installed nice “beams” or crown molding, instead they would have probably trimmed these spaces with a simple straight piece or no trim at all.  Around here, I haven’t seen a lot of beadboard kitchen ceilings, mostly plaster. It is probably a matter of what the local tradespeople at the time were in the habit of using.

Now that the kitchen is such an integral part of our lives, I think it makes sense to design it to the same level of finish as the rest of the house. I also think you should have a little fun with the design. There are too many boring drywall ceilings out there.

Up Next:

The contractors are scheduled to spackle the walls and sand the floor today. It is nice to start to see some finish work.


Leave a comment

Ceiling & Drywall Progress: the first bay has the beadboard plywood installed & they have added drywall to the wall

Andi and Neil’s kitchen is still in the not so exciting to look at phase. The contractors should be there all week which is good news! The ceiling is partially done. They ran into a small hiccup, the the old florescent light that is providing temporary light is hooked into the old knob and tube wiring. They are getting ready to disconnect this, but the new lighting has not arrived yet. So they can’t finish the rest of the ceiling until the new lights arrive. Fortunately they should be here today (fingers crossed). They have installed the 1×8 trim piece around the top of the ceiling. I had them put this in to make sure any uneven wall conditions would be covered up. We will be adding 3 “beams” at approximately 4′ intervals. Not only will this provide visual interest but it will give us a place to seam the beadboard. Most beadboard paneling comes in 8′ lengths (although you can get longer 3/4″ thick pine beadboard pieces in up to 12′ lengths).  The kitchen is about 9 1/2′ wide (so we couldn’t run the beadboard in that direction). The 4 “bays” that are left are designed to have lights centered in them (except for the one over the fridge). We centered the bays such that the light over the sink could also be centered in the bay. It is always a little tricky to get the beadboard spacing right. Unless you have a perfectly symmetrical room you usually have to decide what takes precedence. In our Dining Room we centered the ceiling on the room (and the light fixture) but our windows were not centered on the room, so they don’t align with the ceiling. Andi & Neil’s case is similar. The door openings and opening to the sunroom don’t align with the panels but the lights will all look nicely centered in the ceiling.

The beams will be created out of a 2×4 and then covered with a 1×4 piece of mdf or poplar. Then crown molding will cover the sides. It is a pretty simple system that provides a lot of interest.

1 Comment

East Wall

West Wall

 
I stopped by Andi & Neil’s house yesterday to see how things were going (sorry about the photos being blurry, they were taken with my phone). We are now at the point in the renovation where things appear to slow. It is not that things aren’t happening but electrical work and prepping for the final surfaces is not very exciting to look at! The contractors were busy yesterday putting in the electric for the light fixtures and electrical outlets. They have also finished furring out the north wall where the stove will be, patched the floor and installed the plywood on the ceiling for the beadboard.  They were also finishing up some miscellaneous drywall patching. Next on the list is the beadboard/beam ceiling. Then comes paint (which there isn’t a whole lot of) and refinishing the floor. Then finally the cabinets can be put in.

Leave a comment