Archives For ARCHITECTURE & DESIGN

Chimney Pots (King Arthur)

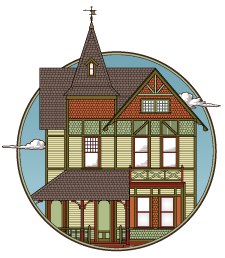
Back of House with Chimney

Front of the House with Chimney

Lining the Chimney is the last item on the list from our home inspector 11 years ago (okay so there might be one or two smaller items still lingering)! We finally bit the expensive bullet and called in the chimney experts. They are scheduled to come out in the next week (weather permitting) with a 90′ crane! Fingers crossed all will go well and there won’t be any surprises!

Background:

When we bought our house the inspector told us that the 3 flues in our chimney were not lined. This included 1 for the oil boiler and 2 for the fireplaces. Well as the years went on, we didn’t dare use either of the fireplaces and even had a 1970s wood burning stove pulled out of the one in our kitchen and the flue for the boiler stayed pretty clean. About 4 1/2 years ago, just as the weather was getting chilly, the oil company condemned the oil tank in our basement. It did not have an obvious leak but overtime hairline cracks had formed in the bottom and if you got underneath (yuck!) you could smell oil. A bit unprepared, pregnant and worried about running out of oil, we quickly had a gas boiler installed to replace the 40+ year old oil boiler. Fast forward a couple of years, and suddenly the flue for the boiler was full of debris! So after putting this off for a bit, and having the flue cleaned frequently, we have decided to get it lined. In retrospect we should have gotten a more efficient boiler and had it vented out the side of the house.

The location of our chimney is in the middle of the house, making access difficult. After reviewing this with our contractor he said that there were 2 options, scaffolding and a crane/boom. Given the location and steep pitch (15:12) of our roof, he felt that a crane/boom was the only real option. Unfortunately they couldn’t access it from the front yard because of the overhead power lines, slope and hedge. So, after looking at the options he proposed coming in from the backyard (taking out some of the fence) and rolling a 90′ crane into the backyard for a week.

Options:

Since we knew we were going to have the crane, we then needed to review the options of what we were going to do in terms of lining the fireplaces and deciding on a cap for the chimney. We decided that we should make at least one of the fireplaces functional. We had them review the options with us. The fireplace in the Living Room has a flue straight up (good for drafting). The fireplace in the Kitchen has a big kink in it (bad for drafting). We quickly ruled out lining the one in the Kitchen. Then came the decision for the chimney cap. Currently we have a large ugly metal cap on the top of the chimney. It helps to keep water from coming in, but is not a pretty site. One option would be to put 2 smaller metal (copper or stainless steel) caps on top. Another option would be to put historically accurate chimney cap on top (2 in our case). Well, after careful deliberation, we decided that the chimney should get some beautiful caps. They weigh in at 140 lbs a piece but I think they are going to be stunning.

Interesting Fact:

Our house did not originally have heat! Instead it had a kitchen stove that would have provided some minimal amount of heat and the 2 working fireplaces. In the early 1900s radiators were added and a coal boiler was put in the basement (and presumably the kitchen stove was changed out). In our case there is a cabinet from the 1910-1920s that was placed in front of the kitchen stove location. At some point 40-50 years ago the coal boiler was replaced with an oil boiler.

Good Info to Know:

-A furnace that is at least 90% efficient should be vented out the side of the house rather than up a chimney. This is because the exhaust is cooler and if it is vented out of a chimney the gases won’t make it all the way to the top because there is not enough heat to make the exhaust rise to the top of the chimney. The advantage is that if you have an old chimney just for this you can avoid lining/relining it. The bad news is that these units are more expensive. However if you are planning on staying in your home for a period of time the cost savings will more than make up for the cost.

-When switching from oil to gas, the built up residue on the walls of the flue are going to deteriorate the flue much more quickly (or in our case from coal, to oil to gas). The gas exhaust has water vapors in it which causes the oil residue that was previously absorbed into the flue to react. If you are switching fuel types, it is a good time to check your flue lining.

-There are several choices of flue liners: aluminum, stainless steel, concrete fill. I would definitely stay away from aluminum, it is not going to hold up!  We are going with stainless steel in our application. Also the flue liner for fireplace and a furnace are completely different. The liner for the furnace is smaller, round and more flexible (thinner gauge). The one for the fireplace is thick and shaped to optimize draft for the fireplace.

Leave a comment

1: Bow Front Vanity

2: Stepped Vanity

3: Wood Stained Vanity

4: Consule Sink


Sarah currently has a 36″ wide vanity in her bathroom with 3 drawers (one for each member of the family). She was considering installing a pedestal sink to make the space feel larger. Pretty quickly, it became evident that a pedestal sink was not going to cut it. With 3 ladies sharing a bathroom, storage is imperative! If we had more time we would have looked for a vintage dresser to refurbish. Below are a few options I selected. Which one do you think Sarah will choose?

1: 44″ Bow Front Vanity:
Pros:
-Curved front has a pleasant shape that helps minimize its size
-Maintain existing locations for plumbing and electric for sconces

Cons:
-Large size could overwhelm the space
-Although there are 8 drawers, they are all quite small

2: 36″ Stepped Vanity:
Pros:
-Same width as existing vanity
-Stepped profile would work well with the adjacent tub configuration (allows better access to shower controls)
-Wider drawers below the sink

Cons:
-The sink is not centered on the unit, so the plumbing for the sink and the electric for the sconces will have to be shifted
-Concern that there isn’t enough counter space to the left of the sink

3: 36″ Wood Stained Vanity:
Pros:
-More ornate looking piece that is closer to resembling furniture

Cons:
-The darker finish could make the space feel smaller

4: Consule Sink:
Pros:
-Larger counter top than a pedestal sink
-Open legs help give the bathroom a more open appearance

Cons:
-There is no storage underneath. A separate storage cabinet would be needed.


Medicine Cabinet

Mirror/Medicine Cabinet:

The existing medicine cabinet is cute but not really right for the space. We discussed keeping it, but because the inside was not very large and the painted surface was looking pretty shabby we decided to look at alternates. Medicine Cabinets do not seem to be in style at the moment, and I found the selection limiting unless you were willing to spend A LOT. I’m not sure why there is a trend away from medicine cabinets.  I understand that you may not need them in a powder room, but in a main bath like this one, I think they are a necessity. Otherwise where do you store all of the little bottles?  The goal was to find one that would be easily to clean and pretty at the same time. This one from American Standard fit the bill nicely. I am actually considering purchasing this one for my bath too. The other good thing is that we can recess it into the wall so it feels more like a mirror.


Leave a comment

Existing East Wall

Existing South Wall

Existing North Wall


I posted Sarah’s Mood Board yesterday, but I thought I would break it out in a little more detail, and show the different options we considered.

The Backstory:
Sarah is all ready to renovate her bathroom. She even has a contractor lined up and due to start in about 3 weeks. One problem, she hasn’t picked any of the fixtures or finishes! With a deadline looming she called me to help her.

The Guidelines:

-Stay within the budget

-Select products that are readily available & fit the space

-Create a unified appearance that blends with the rest of the 110 year old Victorian House

-Maintain a neutral backdrop with small pops of colors and texture

-Maintain storage for the 3 ladies using the space

-Choose finishes & pieces that are easy to clean

-Choose affordable but fun artwork

-Find a better way to hang towels (so they don’t end up on the floor)

-Find a way to hide the hairdryer

-Decide whether the existing linen closet should stay or be replaced

In the next post I will discuss vanities since it was the first piece selected and it will help to define the style of the bathroom and also it is also critical for storage.


Leave a comment

Mood Board

Existing Vanity

Existing Tile w/ new Floor Tile Sample

Existing Linen Closet


Sarah’s bathroom is in need of a total renovation. Her hard working  second floor bathroom serves not only her but her two lovely teenage daughters. The goals are to update the tired bathroom, while choosing cost effective, readily available fixtures and products. The bathroom is in a 120 year old Victorian house, so she wanted it to be in a style that would correspond with the rest of the house, while at the same time feel modern with a hint of femininity. Additional requests were for storage for all of the bits and bobs 3 ladies sharing a bathroom require and maximizing the linen closet. The overall layout and the location of the fixtures are staying the same.

I think it is going to a beautiful space!


1 Comment

Mood Board: New items include carpet, fabric for valance, and wall color


Dining Room circa 2007

Dining Room looking towards back of house

Looking from back stairs


2011-Dining Room (with splash mats)

2011-The piano as dumping ground.


Our Dining Room/ Study/ Piano Room is in need of a little love. We renovated the former kitchen, ice box room and back porch into the Dining Room 4 years ago (while I was pregnant). This included opening up the back of the room to the former ice box room and back porch, adding a “bay” for our desk, putting in french doors and replacing the wood floor. We had a contractor do the big stuff, but we designed and built the beadboard ceiling, we replaced missing wainscot, built a desk and we painted the room.  We were excited to have a functioning Dining Room again but never got around to making it everything we wanted. Now with 2 small kids, we needed to rethink the space.

Stats:
The “room” is actually 2 rooms divided by a large opening.
-Dining Room: 11′x10’6″
Uses: Dining, Arts & Crafts, Circulation, Storage
-Study/Piano Room: 7′x14′L
Uses: Desk, Piano Playing, Toys, Entrance to the driveway, Shoe Storage

Current Problems with the Space:
-Lack of cohesion between the Dining Space and the Study/Piano Space
-The Study/Piano Space is feeling cluttered, especially with the kids toys and shoe pile
-The rugs are looking pretty shabby (the floral sisal rug in the
dining room is 10 years old and is showing its age)
-The Ikea shades in the Dining Room are torn from the kids & cats. Plus we had to cut the cords on the back because of a recall.
-No shades in the desk area

Goals:
-Find a rug with an interesting pattern, that is continuous between the 2 spaces
-Repaint the walls a more saturated color
-Find a window shade solution, that minimizes the view to the
neighbors house but still lets in light. Use coordinating shades for
the desk area.
-Find more storage  for kids toys, arts & crafts & office related items
-Refresh the colors and artwork in the spaces

Leave a comment

123 Years and Counting

February 28, 2011 — Leave a comment

(L to R) Circa 1900, 2001, 2005, 2006, 2006 Dan Bob Thompson Drawing

Built in 1888, our house is a Stick Style Victorian. We didn’t know that when we bought it (or for that matter very much about renovating an old home).

Back in 2000 when we were looking for a house, we weren’t sure what we were going to find. We were living in a small one bedroom apartment in Center City at the time. We needed to find a place closer to where my husband was working and thought it would be nice to find a house in an old established neighborhood in the suburbs. We spent a good bit of time looking online and having a realtor take us around. At first none of the houses seemed right, but then I found a listing for an interesting, albeit slight creepy looking, house. The outside was covered in mustard colored asbestos shingles with brown trim. It had been on the market for a year and a half (the owner was trying to sell it himself) and the price had been lowered 5 times. Our realtor wasn’t quite sure why we wanted to see the house.  The inside was covered with 1970s wallpaper but the layout was original and most of the original trim was there.  The house sat nice and tall. It had some good bones.  It needed LOTS  of work, but the price meant that we could afford to start working on it.  We made an offer.  After a little negotiations we agreed on a price. Then we had our house inspection and I cried. The repair list was LONG. We decided to move ahead anyway. Shortly after the house was ours. 10 1/2 years later we are still working on that list.

Leave a comment