Front Porch w/ Honeysuckle (yes the invasive kind)
I hope everyone enjoyed the three day weekend! We got to do some swimming (okay it was actually more like sitting in the baby pool) and a visit to the zoo. We also managed to get the porch swing hung in its new location. We have already used it too. We hung it on the low side so the kids could get in and out easily. I still need to paint it and get some new pillow. I am also still deciding on the other porch accessories.

Porch Swing hung in its new location (yes, it does still need to be painted)

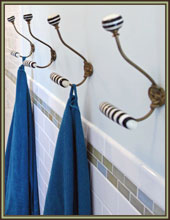
New eye hooks and a chain extension for the porch swing

Porch Swing hung in its new location (yes, it does still need to be painted)
New eye hooks and a chain extension for the porch swing

How to Hang a Porch Swing:
Originally we hung our porch swing on 2 existing hooks (which I’m sure where installed for that very purpose). We decided on a new location, the only problem being that the roof structure is going in 2 directions at this location.
1.Pick up some eye hooks. Note: I went to Home Depot and at first couldn’t find any that would support more than 150 lbs. They all say not to be used for play equipment or for support of people (or something similarly vague and annoying). I managed to find someone who worked there and was actually helpful. He showed me that by the chains (about 20′ further down the aisle) there were some heavy duty eyehooks. I found one that support 350 lbs. It still had the same vague warning but at least looked properly substantial. I went with 2 of those and 2 connection links that could each support a 1000 lbs. I would strongly recommend eye hooks over regular hooks to minimize the problem with the swing falling off.
2.Decide on rough location.
3. Determine which 2 roof joists to attach swing. The one on the left in the photo was the best location in terms of being out far enough from the rail beyond and avoiding the light. The one on the right was about 48″ to the right (similar to the old location). Our porch swing is about 44″ wide.
4. Pick the first location (in this case the left side). We went ahead and installed this hook. This included pre-drilling with 2 size bits (but nothing too big) and then screwing by hand (it helps to put a big screw driver through the eyehook to give you some leverage). Mr. S’s strong hands installed these pretty quickly. I would probably still be struggling with this step.
5. We hung the chain down and measured out from the chain to the guardrail (yes some good old geometry). Then Mr. S stood on the ladder and moved the other chain around on the other roof joist until the distance the guard rail was the same as the first one.
6. Install second eyehook, the same way as the first.
7. Install the “comfort springs” for our bench on each eyehook. I highly recommend the springs! We ordered them with our swing and they give a nice bounce to the swing when you sit down. The kids also like to bounce on the swing.
8. Hang the higher side of the swing at full length.
9. Adjust the links of the lower side until the swing is level (we just put the level on the seat and moved it up and down until it was level).
10. This arrangement worked, but left the seat quite high.
11. I went back over to Home Depot and got an extra foot of chain. Then using the connection link we adjusted the longer side down until level.
12. Sit and enjoy!