
The Valance Fabric and My Sketches for the Design

The top corner of the valance with staples

The pleat on the corner
The Backstory:
When we bought our house it was full of frilly curtains everywhere. One of the first things I did was take them down. They blocked a lot of the light and were needless to say not my style. For a long time we relied on semi-sheer curtains and blinds (or nothing at all). Now that our style is a little more defined, I feel like the windows could use a little punch. However there are two issues that we keep running into. First is that I do not want to hide all of the window molding (this is partially why we bought our old house) and second is that we have a radiator under almost all of our windows limiting the placement of curtains.

Test valance: too long and the contrasting fabric in the pleat didn't look good..

First Valance Finished!
The Design:
When I think of valances the first thing that comes to mind are very fancy frilly window dressings. That is not what I had in mind! I put up valances in my daughter’s room a couple of years ago. These were made out of Orla Kiely dishtowels (from Target). It was a really inexpensive and easy project, so I thought I would do something similar but a little more tailored. I looked online for tutorials and only found 1 that I liked. Pam from Bibbidi-Bobbidi-Beautiful (via Little Green Notebook) made a beautiful curtain/valance out of a king sized sheet. I liked the style a lot but I did not like that she installed the valance with duct tape on cardboard. So I took her inspiration and made mine using a 1×3 piece of pine for structure a the top and attached it to the wall with 2×2 angle supports.
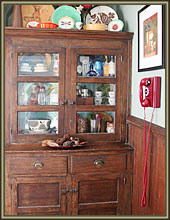
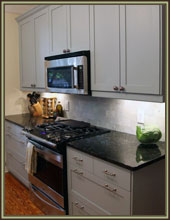
For the fabric, I wanted something that would pick up the blue color on the kitchen island and the dining room hutch, while also looking somewhat Victorian. I also needed something that would go with the new rug. In the end, I selected this beautiful fabric called Elizabeth in Chocolate. The ribbon is from JoAnn’s and is a simple 1″ wide brown ribbon.
The Install:
1. Determine the height and width of the valance. I marked the proposed height with a piece of painter tape before deciding on the height. I decided to go 1/2″ wider on each side of the window trim. Because these windows do not have rosette corners I didn’t mind covering up the top of the window. Also I recommend mounting it a few inches above your window to make the window appear taller (I mounted mine about 7″ above the window frame and aligned it with the door frame for the back stairs). In the picture on the left you can see that in the first version it was too long (about 21″) I used the entire width (about 55″) of the fabric and used the excess width in the pleats. In the end mine are about 18″ high.
2. Cut 1×3 pine to proper length.
2. Cut fabric (keeping in mind that if you are using a pattern with a horizontal repeat that you may have to cut some extra fabric to make sure that the pattern aligns in on all of the valances). I also kept the selvage on and turned it under on the side the seams).
3. Iron seams for the 2 ends. Iron the seam for the bottom.
4. Sew the 3 seams.
5. Iron on the ribbon detail with iron on tape (you could also use fabric glue or sew this on).
6. Iron the pleat locations. I used the wood as a template and marked the fabric with a pin for the corners. You are going to be making “hospital corners”. To do this locate the corner of the side and front. Then fold the remaining middle fabric in half. This spot will also be at the front of the pleat. You need to make basically make a w shape with the fabric. I then ironed this flat and pinned them all together.
7. Staple the fabric to the wood with a heavy duty stapler. I tacked one staple in the middle first then start on one side. First I tacked the side part at the right spot. Then I placed the remainder of the corner pleat on top and fidgeted with it until it was aligned to my liking. Then I stapled over the corner. Repeat on the other side. Then fill in will staples across the top.
8. Attach 2 2×2 angles to the 1×3 pine (you could also do this before you put the fabric on) with a 1/2″ long wood screw.
9. Locate the valance on the wall. Mark holes for wall screws.
10. Install mollies or whatever works best for your wall. In my case because they are so light and I have plaster walls. I just used a 1″ self tapping wood screw.
11. Screw into wall (you may want someone to hold the valance why you do this).

2 Windows in the Dining Room with a Charley Harper print in between.

Double valance over the Desk Area. This required 2 pieces of fabric sewn together and hidden in the middle pleat (please pardon the appearance of our desk).

Dining Room w/ new paint, solar shades and Valances (The child gate is an evil necessity with a set of back stairs like ours. The hole is so that our cats can get through.)


Just stumbled onto your blog while looking for valance ideas for my dining room and wanted to say that yours look perfect for yours. Good job!
Hi Melanie,
Welcome and glad to provide some inspiration!