
Tile Layout for the Shower: 8"x10" white tile w/ 2"x 2" accent tile stripes
We made some final decisions on the tile for our shower over the weekend. We were planning on using white subway tile but because they were slightly off-white I had been a little unsure of how we were going to deal with that mixed with the bright white shower pan. Well on Friday my mom stopped by their local tile place to see what they had. It turns out that they had some bright white tile in 8″x10″ format (an exact match for the leftover tile she had already given to us) that had been returned and they were looking to unload. So I had her pick up enough for the rest of the shower. They were $10 for a box of 20 tiles. That works out to $.90 sf and because we can use her leftover field and trim tile, we will save even more! The tile store was anxious to get rid of the tile so they even threw in a few extra pieces. So basically we are looking at about $80 worth of tile for the entire shower. Not bad! Of course this meant I had to lay out the tile pattern again, to make sure we would have enough! Fortunately we should be fine, although the marble mosaic accent tile is VERY tight (fingers crossed it will cut okay on a wet saw). There is definitely going to be a LOT of cutting of the tile because of the large format of the tile, but it should look nice.

Swanstone Shower Pan: 34"x42" Veritek
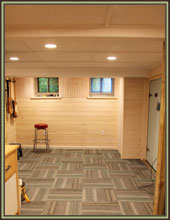
We also finally got around to moving the shower pan to the basement (it had been in a box on the front porch for the last week and a half). The texture on the bottom is not quite as nice as I had hoped (you couldn’t make it out in the photos online) but it should provide good slip resistance (and it means I don’t have to clean the grout on the floor). The front threshold is about 2 1/2″ wide which should allow us to install a shower door (haven’t decided what we are going to do yet) and the side lips go behind the finished wall so it should minimize the chance of a leak in the future. This will be mortared into the floor to help make it rigid, which is ideal for our basement condition (but might be problematic in another condition).
I have also narrowed down the sconce choices for either side of the mirror over the sink. Since the ceiling is quite short, I was looking for something petite but stylish. Here are my choices:

Sconce 1, $69

Sconce #2, $69

Sconce #3, $85

Sconce #4, $139 for 2 ($69)
Sconce #1: Turn of the Century Bath Sconce from Shades of Light
Sconce #2: By Gone Classic Bath Light from Shades of Light
Sconce #3: Trumpet Glass Bath Sconce from Shades of Light
Sconce #4: Mercer Single Sconce from Pottery Barn
Let me know if you have a preference! I am leaning towards one, but am not 100% sold yet. I am also stopping by Home Depot today to pick up the faux slate, so I am going to double check what they have as well.
* To see all of the posts about our basement click here.


I like #2 and #4. I prefer the shape of the glass.
I can’t wait to see your bathroom complete.
Anna, I ordered them and they are suppose to arrive today (it is one of the two you liked).:)
Looks good! How do you like your Veritek shower floor (a year later)? Is it holding up well? Easy to clean? We are thinking about using one, with tile walls as well. Also, what kind of mortar did you set it in? I couldn’t find the completed shower picture…but I’d love to see it if you can point me to it. Thanks!
[WORDPRESS HASHCASH] The poster sent us ’1733574767 which is not a hashcash value.
Hi Chris. It is holding up well. The little divets in the surface sometimes require a brush to get out the dirt, but it hasn’t been a big deal. We quite like it and it was a good price and size for what we needed. I’m not sure which kind of mortar we set it in (my contractor did it). I will ask him and let you know, although I don’t think it was anything special. It does feel nice and solid, so you would definitely want to set it in something.
Here is a link to a couple of photos of the shower:
http://www.statelykitsch.com/our-basement-part-50-an-old-mirror-coral-garden-stool/
Good luck with your project!