Sam’s Top Chef Birthday Invite designed by Mr. S.
This was our first time hosting a kids birthday party. Sam first requested his Top Chef Birthday Party after seeing an episode last fall. We thought that sounded like a fun idea and have spent the last few months mulling it around in our heads. I thought I would give you some of the highlights. I won’t lie, it was a lot of work, but Sam had a great time and was super excited to have his friends over (including both his preschool classmates, his Friday friends and neighbors). Unfortunately, we didn’t get as many pictures as I would have liked because we were so busy. Mr. S. tells me that it is more important that Sam and his friends had fun then getting good photos. I agree in principle, but I am a little sad that I don’t have better pictures of some of the activities and the awesome food and aprons that the kids made.

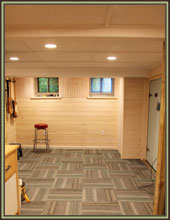
Backyard Set up with Activities
The Plan
I wanted to create several activities for the kids. Given the number coming I thought it would make sense to divide them into 3 groups of 8-9 kids and then rotate them after about 15-20 minutes. After the activites, the kids would eat the lunch they made and have cupcakes. We decided against having an actual competition, to avoid hurt feelings. There was one request to be Padma though.


Kids Aprons
1. Decorate Aprons & Hats: I thought this would be a good activity while we waited for everyone to get here. I bought the hats and aprons from Oriental Trading. I also picked up puff fabric paint and markers from the craft store. One thing I hadn’t accounted for was the paint drying (especially in the warm sun). Most of these ended up drying in the sun for the rest of the party. I also bought a bunch of foam stickers for the kids who didn’t want to paint. I bought pirate stickers, so not surprisingly most of the boys used markers and stickers and most of the girls used the glittery puff paint. Fortunately the aprons came in lots of colors, so everyone managed to get a color to their liking. A lot of the kids were not in favor of the hats (which definitely require additional double stick tape).

BBQ Skewers for Fruit Kabobs

Fruit Kabobs made by Sam

Sam eating leftovers
2. Fruit Kabobs: I wanted to offer something besides just junk food (although plenty of sugar was eaten). So I decided that fruit kabobs would be fun. I used 12″ wooden BBQ skewers from the grocery store. To add some color and keep the fruit from sliding off I added “flags” made of washi tape. This also gave us a space to write the kids names. Then we put them on big platters w/ mesh bug covers. I choose fruit to have all of the colors of the rainbow: red/strawberries, orange/mangos, yellow/pineapple, green/green grapes, blue/blueberries and purple/red grapes. The strawberries (all 3 pounds) were the first to go.

Cookie Supplies (after the party)

Maisie’s Cookies

Maisie eating her creation
3. Decorate Cookies: I decided rather than a lot of favors, I would have the kids decorate cookies and then have them bring them home. I made the cookies on lollipop sticks. I made 3 varieties of sugar cookies: chef hats/cupcakes, stars and circles. I also made a frosting that hardened well in several colors, in addition to lots of jimmies, sprinkles and decorative frosting in a can. I also tried small chocolate chips but they started to melt so we had to give up on those. I made the cookies ahead. It was pretty time consuming (especially battling the hot weather to keep them from getting to melty).

Pizza Sign

Pizza Making in Action

Maisie’s pizza

Sam & me working on his creation

Maisie working on her pizza
4. Make Pizzas: This was definitely the most work and required careful timing, but I was really amazed at how well they came out. We divided each ball of pizza dough (from the local pizza shop) into 4 and wrapped each in plastic wrap the afternoon before. We preheated the oven to 525 about an hour before the party (and jacked up the AC). We were able to fit 2 pizzas per shelf (for 6 at a time). At that temperature they cooked in about 8 minutes. Given how some were full of sauce and thin and others were thick, I was pleasantly surprised at how well they all came out. We offered tomato sauce, bbq sauce, mozzarella cheese, cheddar cheese, mushrooms, olives, red peppers, yellow peppers and green peppers.

Sam with his cupcake!

Sam with his friends

5. Eating:
After the activities were finished the kids ate (fortunately one of the other moms stepped in and cut all of the pizzas). While they were eating we packed the cookies up into bags and put out the duck favors. I used a fun circular punch for the thank you tags. Mr. S. designed them and printed them out on card stock for me. I used the same punch for name tags on the pizza (glued to toothpicks) and for cupcake toppers. On the backs of those I punched out colorful paper.

Apron & Hat Decorating
Lessons Learned
1. Get Help: It is a LOT of work to run a birthday party. We had one of the kids teachers help as well as 2 teenage girls (who babysit the kids). I put them each in charge of an activity while my sister-in-law and I manned the pizza station. Mr. S. floated to keep an eye on everything and take pictures. In the future I think I would have assigned one of the other parents or an additional helper to take pictures. My helpers also stayed for a little bit after to help with clean up (which was definitely helpful).
2. Flexibility: The best plans require flexibility. I imagined that we would use a timer and rotate the kids at 15-20 minutes. In reality, as soon as they were done with an activity they ran to the next thing (or to play). I had to gather different kids to make pizza several times.
3. Timing: Younger kids tend to do well in the morning. We scheduled this party from 10:30-12:30. This worked out well because the kids tend to pay more attention this time of day. I think the 2 hours was just about right for the kids who ranged mostly from 2-5 years old. Much longer than this and they tend to get restless.
4. Have Fun: This is probably the hardest thing for me. I was worried about everything. But ultimately you are doing this for your child and they want to have a good time, and part of that is sharing it with you.

Sam and his loot!
The good news is that Sam and the kids had a great time! I should hopefully be recovered by next year. Thanks to everyone who came and helped to make my little guy’s birthday so special!