Archives For -Basement

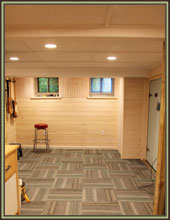
Carpet Tile Samples (sitting in our Dining Room)

I hope everyone had a good weekend! We were in birthday party mode, which is great for the kids but not so good for getting much done.  We did manage to put up a little bit more insulation in the basement. We realized where we were storing the extra rigid insulation (2’x’8′ pieces) is in an area that is about to be very difficult to access (at least for giant pieces of foam), due to the shower location. We carefully  feed the 10 pieces through the studs of the shower and out to the large room in the basement. We also went ahead and put up every last bit that we could except for the final wall where we still need to wait on the pvc waste pipe to go in. So for the time being the large pieces are being stored in that area. We have also scheduled our trusty plumber to come by on Wednesday for the rough-ins for the bathroom, which we are almost ready for (a few small things need to go in first).

So anyway, back to my Carpet Tile Story. I decided to order carpet tile from an online store called Carpet USA after scouring the internet and a few local places for a good deal on carpet tile. They offer some INCREDIBLE deals on inexpensive carpet tile. I got to be my own guinea pig in this case and gave them a try. After spending a couple of hours sorting through their selections of $.69 sf carpet tile I decided on the one above. Of course I only had a picture to look at, not a nice sample to check the actual color. So the verdict? It is slightly different hue than the photo online, but definitely close enough that we are okay with it. In person I think the blue-green is a little more green and the gray has a slight hint of purple. The texture is nice (although quite thin since it is designed for office space) and the backing is nice and thick.  So I think it is a winner! The most interesting part besides talking to the very nice southern guy from the store was going to pick it up!

Part of the good deal on shipping ($99) is due to having it either delivered to a work address or picking it up at the shipping terminal/warehouse. Since we live only a few miles from the shipping warehouse I went that route.  The warehouse is in a strange area filled with lots of truck bays, semis and unmarked doors (right near the Philly airport)! I was over in the same area a long time ago picking something up. You definitely feel out of place. The first trouble I had was the address. The address covers 2 giant buildings. I had the name of what I thought was the shipping company so I drove slowly past all of the doors 3 times looking for it (while trying to stay out of the way of a bunch of trucks). I was driving our old Explorer which the kids have affectionately named “The Mommy Truck”, so at least I didn’t feel extremely tiny. After that I called the 800 number, which forwarded me to the local company. They assured me that I was at the right address and they were “in the middle”. So I drove around again without luck. I called again. This time she told me that the name on the door was a different name then the one I had been previously given. hmmm…isn’t that something that would be important to mention earlier? So I finally found the right door and parked. I walk in and they stared at me. The lady I talked to on the phone was confused because she assumed I was coming in a commercial truck. Interesting! Fortunately after I stood there for a minute another guy came out and said that he had my slip and to pull around to the loading dock. So me in my “little” explorer backed up into the semi sized loading dock and a guy with a fork lift brought out my tiles. It was a pretty funny sight! Fortunately when I had ordered the tile I had asked the guy about getting it into my car. He said that the carpet tile would be on a palette wrapped in plastic wrap and to just ask them to remove the plastic wrap and load it in (part of the deal is that they won’t help you put it in your vehicle). Fortunately the guy with the forklift gladly cut the plastic wrap for me and even helped me load it into the back of the truck. I had brought my work gloves and worn my old coat and in the end it took about 2 minutes once I backed up. I think next time I will opt for the business delivery!

Now I have to store the carpet tiles until we need them (probably about a month). For now they are still in the back of the mommy truck, but they may need to move into the garage depending on how everything goes in the next month.

Kolja Mirror from Ikea, $14.99

In other exciting basement news, I ordered the sconces for the bathroom. They should arrive today (stay tuned for pictures)! I am also rethinking the mirror above the sink. I realized that the old mirror may not fit comfortably with the sconces (and I don’t want it to look like I squeezed them in just for the sake of reusing the mirror). I am thinking of using a round mirror. I found this one at Ikea for $14.99 and the sconces should fit comfortably and it is even designed for wet spaces! I would also like to put a small glass shelf below, but I haven’t picked one out yet. I have also been looking at storage options for above the toilet, but haven’t found a clear winner yet. I think I might see what is at Ikea next week. I might go with a simple shelf and some metal wire locker baskets, which are quite popular right now.

Adjustable Glass Shower Door from Overstock, $584.50

We are also still unsure about what we are going to go about the shower door. I would like a pivoting glass door, but given the cost we may go with a shower curtain for now (since it would be easy enough to add later). My mom did find this one, the Dreamline Allure Adjustable 36-43″ shower door at Overstock. I also looked at some standard ones at Home Depot. The standard ones at Home Depot are all quite short, which I don’t like. I think we will need to see where the budget is when we get a little further along.

Anyone have any good leads on glass shower doors?

* To see all of the posts about our basement click here.

1 Comment

Our New Bathroom! And look it will even have a regular size door on it!

Our contractors were busy yesterday putting up the studs for our basement bathroom! It was a very exciting day here. I squealing in delight at them (fortunately they know me pretty well by now) and after they were gone I did a little dance in our “petite” bathroom (and by petite I mean larger than our upstairs bathroom) .

Sink and Toilet Wall

For our bathroom is using a mix of new and old things. We are reusing our old small sink from our upstairs bathroom. It has been patiently waiting up on the third floor for the last 10 years. Yeah Free! And yeah one more thing out of the 3rd floor! It is cute and vintage (probably from the 20s-30s)  but not particularly practical for the main bath (lack of flat space). We are also reusing the mirror from the old basement bathroom. The frame is an unfinished wood. I haven’t decided what color I am going to paint it yet, but the glass is nice and thick and sturdy, so it should hold up just fine. I am going to buy some kind of shelving for above the toilet. I have started looking but haven’t found anything that I like and is inexpensive yet. For the toilet we are buying a new dual flush. We could have reused the old toilet, but it was NOT efficient so the decision was made to upgrade to new one. One added benefit of the dual flush is that the tank is very small, so the toilet itself is a couple of inches shallower than a typical toilet (very helpful for a small bathroom).

Shower Alcove

I’ve already shown you all of the exciting things for the new shower. Now just try and imagine! 🙂

Now it is time for the plumber to come in and do all of the rough ins for the plumbing. This also involves redoing the main hot and cold lines and the lines and the connections to the upstairs bath (we will be connecting to them at the back wall of the bathroom behind the shower). This should clear out quite a bit in the bathroom ceiling. The existing gas line and radiator line, will be painted and left below the beadboard ceiling.

I also picked up the carpet tile yesterday which was a whole other adventure involving me driving around in our old explorer (aka “the Mommy Truck”) in between big semi-trucks (so stay tuned for that on Monday!).

* To see all of the posts about our basement click here.

Leave a comment

New Concrete Floor!

It might look like a baby step, but having a concrete floor again is very exciting (except for the fact that we will be without a washer and dryer for another day or so while it dries)! Yesterday our contractors moved the drain for the shower pan which required removing some more concrete and dirt and adding to the pvc waste line (we decided to shift it over to avoid the main beam and give ourselves a couple more inches of headroom). They also had to dig out some more dirt so that they could get a thick enough slab for the floor. Then they poured it yesterday afternoon so it could start curing over night.

Shower Pan Drain Pipe

Bottom of Shower Pan

My favorite move on their part is using the styrofoam block as a form to keep the concrete away from the drain for the shower pan (which sticks down a couple of inches). When they set the shower pan they will use a sandy grout mix to keep the floor feeling solid.

So next up is actual setting the shower pan, so that they can start framing the walls for the bathroom up. The bathroom down there use to be open to front room (really weird I know!) so I am really excited at the concept of having an actual bathroom with 4 walls! We aren’t adding very many walls in the basement (except for framing out all of the exterior walls) so hopefully it will start feeling more like a finished space soon.

* To see all of the posts about our basement click here.

Leave a comment

Tile Layout for the Shower: 8"x10" white tile w/ 2"x 2" accent tile stripes

We made some final decisions on the tile for our shower over the weekend. We were planning on using white subway tile but because they were slightly off-white I had been a little unsure of how we were going to deal with that mixed with the bright white shower pan. Well on Friday my mom stopped by their local tile place to see what they had. It turns out that they had some bright white tile in 8″x10″ format (an exact match for the leftover tile she had already given to us) that had been returned and they were looking to unload. So I had her pick up enough for the rest of the shower. They were $10 for a box of 20 tiles. That works out to $.90 sf and because we can use her leftover field and trim tile, we will save even more! The tile store was anxious to get rid of the tile so they even threw in a few extra pieces. So basically we are looking at about $80 worth of tile for the entire shower. Not bad! Of course this meant I had to lay out the tile pattern again, to make sure we would have enough! Fortunately we should be fine, although the marble mosaic accent tile is VERY tight (fingers crossed it will cut okay on a wet saw). There is definitely going to be a LOT of cutting of the tile because of the large format of the tile, but it should look nice.

Swanstone Shower Pan: 34"x42" Veritek

We also finally got around to moving the shower pan to the basement (it had been in a box on the front porch for the last week and a half). The texture on the bottom is not quite as nice as I had hoped (you couldn’t make it out in the photos online) but it should provide good slip resistance (and it means I don’t have to clean the grout on the floor).  The front threshold is about 2 1/2″ wide which should allow us to install a shower door (haven’t decided what we are going to do yet) and the side lips go behind the finished wall so it should minimize the chance of a leak in the future. This will be mortared into the floor to help make it rigid, which is ideal for our basement condition (but might be problematic in another condition).

I have also narrowed down the sconce choices for either side of the mirror over the sink. Since the ceiling is quite short, I was looking for something petite but stylish. Here are my choices:

Sconce 1, $69

Sconce #2, $69

Sconce #3, $85

Sconce #4, $139 for 2 ($69)

Sconce #1: Turn of the Century Bath Sconce from Shades of Light
Sconce #2: By Gone Classic Bath Light from Shades of Light
Sconce #3: Trumpet Glass Bath Sconce from Shades of Light
Sconce #4: Mercer Single Sconce from Pottery Barn

Let me know if you have a preference! I am leaning towards one, but am not 100% sold yet. I am also stopping by Home Depot today to pick up the faux slate, so I am going to double check what they have as well.

* To see all of the posts about our basement click here.

6 Comments

Helper #1

Helper #2

I have Jury Duty today, so I am little behind on things. We did manage to install most of the pink rigid polystyrene insulation in this weekend. There is still a little more to do, but we can’t do that until some more plumbing is run. The contractors now aren’t coming until Wednesday, but hopefully by this weekend they will have installed the concrete on the floor, placed the shower pan and run the plumbing so that we can finish the insulation. Since the pictures are still quite boring I thought I would show you our “helpers” instead. Hope everyone had a good weekend!

* To see all of the posts about our basement click here.

Leave a comment

Shower & Tile for the Bathroom

It feels a little like Christmas here with all of the boxes! Quite a few things have arrived and bunch of items will be here soon. I will also have to pick up some stuff over at Home Depot in the next few days. My contractors are scheduled to start on Monday so it is actually time to get moving!

We have also decided on most of the tile. We are going to go with the 3×6 ceramic subway tile at the top of the picture for the field tile. It is available by the piece at Home Depot, which is conveniently located right around the corner (including all of the cove and odd size pieces). The good news is that it comes in at $1.86 a sf. The bad news is that the white is definitely not “bright”.  You can tell when you compare the top tiles to the tiles at the bottom of the picture. The bottom ones are larger 8×10 tiles that my parents had leftover from their shower. They graciously offered to let us have the leftovers. Unfortunately it is not such a good match and if I use it, it will probably bother me! I am still trying to come up with a way to use at the bottom of the shower and then introduce the stone stripe and then switch to the home depot tile. hmmm…stay tuned as I finish laying it out! And of course the shower pan is BRIGHT white. It also looks like I have just enough tile for 4 stripes of the stone accent.

Off White Subway Tile at the Top, "Biltmore" Stone Tile in the Middle and Bright White Large Tile at the Bottom

In the meantime I have been making lots of lists: lists for our contractor, including framing, plumbing, electric and finishing and lists for us. I also have a long list of “to discuss” items. So far it is 3 pages long!

Floor Plans showing tile and carpet tile patterns

Reflected Ceiling Plan w/ "beams" and lights

I have also been working on my plans and reflected ceiling plans for the space (click on them to see them larger). Sorry they aren’t prettier, but right now it is all about dimensions and figuring everything out! There are several dimensions that are tight and need to be spot on in order for everything to work. I also laid out the flooring, to make sure I was ordering enough. The ceiling is especially tricky because we have all kinds of stuff going on up there, and most of it needs to be accessible. I am trying to find a nice way to achieve a beadboard and beam ceiling without it looking too chopped up.

We have a bunch of insulation to install this weekend before they get here. Wish us luck!

* To see all of the posts about our basement click here.

Leave a comment

Basement Main Room Materials and Colors

For the main space of our basement we decided that we wanted something warmer on our feet. We had carpet in the basement previously everywhere, including the bathroom. I guess that shouldn’t be a total surprise since our upstairs bathroom had carpet in it too! Gross! I think I had blocked that out of my memory. Anyway back to the carpet. I have been searching for inexpensive but durable carpet tile to put install down there. I like the idea of carpet tile, because you can replace individual sections and it has a rubber backing on it that will deal with moisture better than broadloom carpet. What I don’t like is the price! Most good carpet tile runs $5+ a sf (i.e. FLOR), which seems like too much to spend for our basement.  So I searched and searched the internet for a good deal. Then I came upon my answer, Carpet Corporation of America based out of Georgia. I mentioned them before but I wasn’t sold on the pattern so I had been waffling.

Here are the options we looked at:

Odd Lots "Bright"

Odd Lots "Grey"

1. Odd Lots: The least expensive are Odd Lots. These are priced in the $.29-.49 sf range (.29 for Class A Seconds and .49 for First Quality). They come in several color families including Grey Family, Earth Family, Bright Family and Blue Family. They look quite fun and under different circumstances I would have used them in a second. Normally that would be right up my alley! I was having issues though with these paired with all of the beadboard. That is a lot to take in! So back to the drawing board!

This was our second choice

Carpet Tile We Selected

Another Option that was too tan

Another Option that I decided was too light

2. Small Lots (basically leftovers): These are currently on sale for $.69 sf.  They offer small (and sometimes large) amounts of several hundred carpet tile patterns. The images are on the website but I was confused about the quantities. So I called them and they showed me where you could download a pdf  spreadsheet showing the quantities of each (click on the second dog outline down from the top to download from their website). Then you have the long task of sorting out which carpet tiles they have in the quantity you need. We needed 300 sf (for a 250 sf room with extra for cutting and replacement).  It took me a couple of hours to sort through everything, but I managed to narrow it down to a few that I thought would work with our color palette. There are some CRAZY patterns that could be pretty fun if you felt like making a statement.

Shipping: This is often the dealbreaker. Either it is too expensive or too difficult to coordinate. The way that they work is to use freight (which means sitting at your house all day waiting for a truck to pull up and for you to unload it). Fortunately they recommend two options. One is getting it delivered to a business address, so you can unload it from the truck to your car. The second is picking it up at a distribution center. Fortunately we live only a few miles from the distribution center, so I am going with that option. I will still have to load it into my car myself, but I can schedule the time, which is really helpful (especially with 2 kids). The price came in at $99.90 for shipping.

I ordered the carpet yesterday and it is suppose to be at the distribution center by early next week! The total for everything was $306.90 (basically $1 a sf). So stay tuned to see how the quality and installation goes!

What do you think?

* To see all of the posts about our basement click here.

4 Comments

Pink Polystrene Insulation w/ Tyvek Tape

I hope everyone had a good weekend. We were busy in the basement and it is starting to look pink! We started installing the 2″ tongue and groove extruded polystrene insulation against the foundation walls. We had to set them a little bit out from the wall since there is a lip at the ground from the basement waterproofing/drainage system. We also are leveling these so we need about 1/2″ of space anyway to allow for the variation in the old stone rubble foundation and the parging that was troweled on top. We didn’t get quite as much done as we would have liked, but it is relatively east work. Our contractor is due to start next week on actually putting up walls! Yeah! We should be able to get most of the insulation in by the end of this weekend (or at least the areas that he will be starting on).

Mr. S holding the old column

We also took out the old column in the middle of space, which was pretty cool! It is amazing how HEAVY this small column was (I guess that is what happens when you are using virgin pine stock). The smell of pine immediately filled the air! We are going to keep up, not sure what we are going to do with it though. The photo at the top now is also much easier to take since the old column was right in the middle of the space.

Gap between wall and rigid insulation (bottom gray lip is from the drainage system)

Here are a few things we learned installing the rigid polystyrene insulation:

-It is expensive at about $16 for a 2’x8′ sheet. (we estimate that we will need 45 sheets)
-2″ extruded rigid polystyrene insulation comes with a tongue and groove. 1 1/2″ comes shiplapped.
-You want to tape the seams to provide a tight seal. The general recommendation is to use Tvyek tape (which is readily available). Duct tape is not going to cut it here (especially after you shell out all this money for the insulation itself). The point of adding this insulation layer continiously is to maximize the R-value and seal it completely, so this is very important.
-After experimenting with cutting, a long utility blade works best (with a metal guide). We have one made by stanley, but several companies make them. The nice thing about this blade is that it will extend the whole 2″ so you can get a good cut. You do need to change the blades fairly frequently, or it get tougher to cut.
-We had heard several recommendations  for cutting with an electric meat knife. This did  NOT work very well at all, and started to smell pretty quickly.
-We attached the insulation with a screw at each floor joist above. Since the boards are all connected and taped they stay pretty stable with minimal attachments.
-It is important to keep in mind that this stuff is flammable, so the code requires that it does not stay exposed (you must cover it with drywall or other suitable finish material). We will be finishing with a 2×3 stud wall in front and varying finishes for the walls in front to seal it off. We are also going to use mineral wool in our electrical closet area (on the right of the picture at the top) and at the top of the extruded insulation to close it off.
-You want to level each board as you go, since if you are off on one board the issues will compound as you move down the wall.
-We recommend installing them vertically rather than horizontally.
-This is totally doable as a DIY, as long as you have the patience. We estimate that this will save us around $400-500 in labor.

Wall after Parging

Wall after Waterproofing

Wall after Insulation

It is time for me to order the faux slate flooring today! I need to get moving on actually getting materials here! I can’t believe we will actually start to have finish spaces in the near future.

* To see all of the posts about our basement click here.

Leave a comment

Moen Handshower w/ Slide Bar$134.95

Now that our shower pan is here, it is time to get moving on figuring out all of the details for the shower. Since we are installing all new walls I was able to use a pre-made shower pan, which means no grout cleaning (at least on the shower floor) for me! Next up is the shower itself. The ceiling height is quite short in this area so I wanted to have some flexibility in the shower head height. To maximize the height on the shower head we went with an adjustable shower mounted on a bar. On a normal shower you loose several inches due to the spout angle.  With this set up you can adjust the shower set up to the ceiling, or down low for the kids. My parents have a similar configuration in their shower and they love it.

I went round and round trying to find just the right setup at a reasonable price. It meant actually have to order 4 parts separately (a total pain!) to get what we wanted. I also now understand WAY too much about how a shower works and the different options and parts.

First up was the handshower. I wanted one with several different spray options. This eliminated quite a few of the sets. I also wanted one that included the slide bar. There were several major manufacturers to choose from, and it took me a while to weed through the various configurations to come up with this Moen model (3867), which comes in at $134.95.


Moen Kingsley Single Lever Handle, $53

Moen Drop ELL-connector for shower, $26.95

Moen 2520-2T Rough-In Valve, $55

Next up is the connector to the wall (drop Ell). I’m not sure why this wouldn’t come with the handshower system, but it doesn’t. Fortunately I found the right part after a little searching. Another $26.95 down the drain! Although I didn’t buy my shower from FaucetDirect.com I do recommend looking there, because they have very helpful descriptions that usually tell you the extra parts that you need to go with your set.

Finally was the control lever. This doesn’t have to be by the same manufacturer as the shower itself, but I figured I would stick with the same one anyway. When pricing these keep in mind that the actual controller in the wall will need to be bought separately. And these vary in price quite dramatically depending the brand. I also double checked with my plumber on which valve to buy, since it depends on your plumbing situation (copper or pex). It was also interesting to see that Home Depot was definitely not the cheapest place to buy the parts.

The Tile

"Biltmore" Tile from The Tile Shop $3.99 sf on clearance

I am still a little bit undecided on the field tile for the shower. I bought some beautiful accent tile on clearance at The Tile Shop a couple of months ago when I was looking at options. I have enough that I can have 3 or 4 stripes in the shower. The “Biltmore” tile I bought (they still carry several other patterns) has a greenish square in the middle and grayer marble surrounding it.

"Royal Satin", $9.99 at The Tile Shop

Whte Subway Tile

For the rest of the field I need to decide on either marble or white ceramic subway tile. The marble subway tile is about $9.99 sf verses about $2 for the white subway tile. The marble tile is quite beautiful, but is it worth the price for the basement?  I need about 65 sf worth so we are looking at a price of $130 verses $650. I think I may have found my answer! Although the satin marble does beg to be touched! What do you think?

Finally for the floor in the bathroom I will be using Faux Slate. Which I think will look great, and makes me think that a gray grout in the shower might be nice to play off the gray of the floor.

I need to make my decision on the wall tile in the next week or so and I also need to order the faux slate floor from Home Depot (they are  the only ones who make it and it is a special order). I would love to hear your opinion on the wall tile.

* To see all of the posts about our basement click here.


2 Comments

Our Basement Mood Board

Today I thought it was about time to show you some pretty images! I put together a quick mood board for the basement. Most of this stuff is currently on my Pinterest Board but I thought it was about time to put it all together. In general I am happy with the look. The biggest issue I see at the moment is the carpet tile for the main room/pantry. I’m not sure it looks right with everything else. The good thing is that we will be installing it so it will be one of the last things to go down, so I’ve got a little time.

In basement progress news, our new sump pump and drainage system were put to the test on Monday! The rain combined with the melting snow meant LOTS of water. Our backyard turned into a giant mud pit (Sam was VERY excited!). The good news is that we went down into the basement to see how everything was doing we heard the faint sound of the sump pump. How exciting! And it didn’t feel the slightest bit moist down there (which is a big change). Also the hole for the shower drain had been getting water in it (since it is a good 9″ below the floor line) but it was bone dry, the clay didn’t even change into its bright orangy clay color; it looked dusty! Yeah! Very exciting! So now it is time to get moving on making the space usable!

Shower Pan (ours is white)

There are still a couple of things on our list before the contractor starts. The first is having the shower pan ready to go, since the walls get built around it and we are trying to maximize the ceiling clearance within the shower. The good news is that the shower pan arrived a couple of hours ago! I ordered it online and was disappointed to hear that it was coming freight (the website said it would come UPS), which meant having to be available between the hours of 9-5 and then having to lug it into the house myself. Fortunately the delivery guy came in the middle of day and actually carried it up onto the front porch.  Of course I now have to take it off the front porch and bring it around to the back stairs, but at least it is not sitting on the sidewalk.

2" Tongue and Groove Polystyrene Insulation

The second thing is installing the rigid insulation. We decided that we would save some money and install this ourselves. So we will be installing 2″ tongue and groove rigid polystyrene rigid insulation continuously around the entire foundation wall. We will be putting wood blocking at the top that will be attached to the joists above. This will align with the lip from the drain below. Once this is leveled we will attach the insulation to the blocking at the top and to the ground. We can also use a sanded grout to adhere it to the waterproofing membrane if that becomes necessary. The goal is to install most of the insulation this weekend. Fingers crossed it will go well. I will be making a bunch of trips to Home Depot to pick up enough! Fortunately it is less than 2 miles away.

* To see all of the posts about our basement click here.

1 Comment